How to Draw a Persons Arms Covering Their Face Easy
How to Draw Arms
In this tutorial, I will be teaching you how to draw arms, how to recognize arm dimensions, and length of the arm compared to the rest of the body.
The thing people usually get wrong when drawing arms is making them too long or short, and drawing unrealistic bends or angles in the arms.
Before you learn how to draw muscularity, you need to know how to draw a basic, lean arm without much muscle mass.
This way you can get more familiar with how arms bend and move.

Intro: How to Draw Arms for Beginners
A lot of people will tell you that drawing arms is complicated.
It's true.
Arms have so many bones, muscles, tendons and are a very complicated part of the body.
The anatomy of an arm is something that all artists should be familiar with, but this post is going to make it as simple and easy to learn as possible.
Not all characters will have noticeable amounts of muscle, to begin with.
And that is why I don't teach that in this tutorial.
If you are a more advanced artist and want to go in-depth with the anatomy of an arm and learn the musculature, you may want to head on over to our advanced section and read this post: How to Draw Arms, Musculature & Movement. – COMING SOON –
For now, I will teach you the anatomy of the arm, and how to draw arms in these 4 simple steps.
How to Draw Arms in 4 easy steps
For this tutorial, I am going to show you how to draw someone with their arms down by their sides.
This way, we can easily look at the anatomy and proportions of the arms.
Step One: Draw the Shoulder Joint
The shoulder joint is where the shoulder attaches to the humerus bone, the bone in the upper arm.
This is where we will start whenever we are drawing arms.
Start by drawing a circle where the shoulder of your character will be.

Step Two: Draw the Wrist
Where do you want your characters' wrist and hand?
Drawing the wrist before drawing the elbow will help us to later find where the elbow should be.
If the elbow is in the wrong place, it can mess up how the whole arm looks.
The wrist joint should be level with the pubic bone.

Step Three: Find the Elbow
The elbow is the halfway point of the arm and should be as long as the bottom of the ribcage.

Step Four: Outline the Arm
Once you have drawn the shoulder joints, wrist joints, and have found the elbow, you can now outline your character's arms.
You can also now draw your character's hands.
If you want to learn how to draw hands, I will have a tutorial on how to draw hands, coming soon.

Length and Proportions of the Arms
In this section, we are going to talk about the proportions of the arms.
The length of an arm is measured from the top of the shoulder to the end of the fingertips.
The length of the arms is also typically the same length as the person is tall, this is referred to as the wingspan.
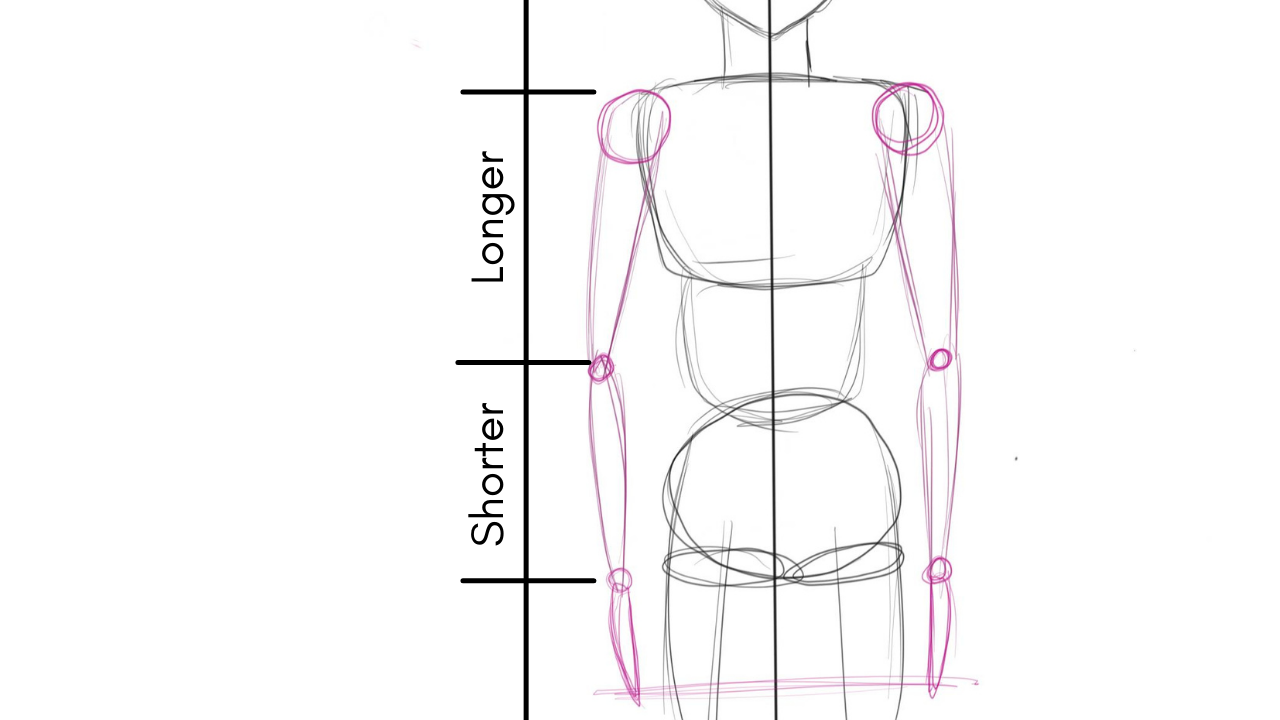
The arm can be broken down into three sections:
The upper arm, lower arm (or forearm), and the hand.
The upper arm, from the shoulder to the elbow, is longer than the lower arm, from the elbow to the wrist.

Let's look at another example of proportion:
Like we talked about above in the tutorial section, the elbows should be about as long as the ribcage.

Making the elbows too far above or below the bottom of the ribs can throw off the anatomy of your character's arms, and make the picture look odd.
This also applies if the elbows are bent.
As you can see in the image below, her elbows are still at ribcage length.

Finding the elbow when the arm is bent
Let's look at how to easily find the elbow!
What I am about to teach you in this section is one of my favorite artist tricks: Finding the Elbow.
This may seem simple, but can be tricky to do if you don't know this tip.
Misplacing the elbow can throw off all of your proportions that would otherwise be correct.

Start with the shoulder joint.
Once you have that, draw the small circle that will represent the wrist.
It may seem odd to draw the wrist joint before the elbow, but trust me.
After you draw the shoulder and wrist joints, draw a straight line connecting the two.
Draw a horizontal line starting at the center of the connecting line.
On that line, we find the elbow.
Why Proportion Matters
Proportions are the cornerstone of any drawing.
They are what make a drawing look more balanced and realistic.
When proportions are off, the whole drawing falls out of place or looks intentionally "goofy".
There are obviously some bad things that can happen when we ignore proportion in our drawings.
Like this drawing below.
Her hand is way smaller than it should be, and her upper arm is very long. At first, this image looks fine.
But you can tell something is off.

How to Draw Crossed Arms
This section goes over how to draw arms crossed in front of the body.
A common mistake when drawing crossed arms is to make them flat, with a 90-degree angle.
You want some curve to the arms when they are crossed.
Here is an example of how to draw crossed arms.

The purple line in the image above shows the curved angle the arm should be at.
A good way to see how this should look is to look in a mirror and cross your arms in front of you.
Once you have drawn the top arm, it's easier to find where the bottom arm should be.
Your finished image with the arms crossed should look something like this:

Final Thoughts
To get better at drawing, you have to draw.
Repetition really will be key when learning how to draw arms or any part of the body.
So practice the techniques you learned in this tutorial often when drawing, and you will get better at drawing arms in due time.
"In drawing, nothing is better than the first attempt."-Pablo Picasso
Interested in taking your art to a new level?
Ever wanted to see how artists create full-color dynamic characters, including shading tips and lighting?
Joining my Patreon Community gets youbehind the scenes of all my recent work!
I show you step-by-step how I create some of my favorite characters,
teach you some of the techniques that have made my art dramatically better,
andmy Hero tier gets rewards in the mail every single month!

Click on the image above, or visitpatreon.com/leahharris to start your own art journey today!
See you in the next tutorial!
What to draw next:
If you haven't already gone through my tutorial on how to draw legs, that would be a great place to go next.
- Bio
- Latest Posts
- Bio
- Latest Posts
Source: https://anatomyofasketch.com/how-to-draw-arms-for-beginners-easy-tutorial/
0 Response to "How to Draw a Persons Arms Covering Their Face Easy"
Post a Comment